There are several ways to start using Actpay in the middle of the year. Following are 3 ways to get it done quick and easy. 3rd method is the easiest.
Problem statement
- Personal information needs to be added.
- Archive data of past months need to be entered.
- Calculations must match past data.
Add Personal data
There are 2 ways to do this.
- Enter directly. It is not necessary to enter all the information. The basic information to get started are :
- Employee No. – Both alphabets and number are acceptable. Recommend alphanumeric. E.g. A001
- Basic Pay
- EPF, SOCSO, PCB and Resident Defaults are ok for most staff. Change if necessary
- For PCB, Enter No. children. More detailed children status can be entered in the Additional Information Tab. There are extra deductions for children in diploma/tertiary education.
- For PCB Enter Marital status
- This software has a function to Import xls or csv files. We recommend using xls. Template can be found in the Actpayroll directory – “employee template EXAMPLE.xls”. Detailed Information is available at https://kb.actpayroll.com/import-data-excel-sheet/

Adding Historical Data
There are several ways to do this, but we recommend the following procedure for those who have done the earlier months manually. Although Method 1 is the best and proper way of doing it, Method 2 will allow you to start using the software immediately. The only problem is that you may not have the data needed for the EA form at the end of the year.
Method 1
This is probably the easiest. Most small SME’s do not have allowances and deductions. Variable data is limited to overtime.
Initial Setup of Allowances and Deductions.
If you have allowances and deductions, please add them first. Information can be found at :
- Adding Allowances and Deductions
- Adding Allowance, Deduction and PCB into Month Screen
- Video – Initial Setup and First Run
* Watch Video in 720 pixels for better clarity
Change Default PCB settings
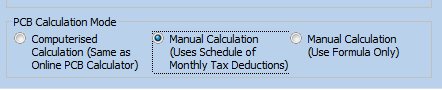
Before updating the information it is necessary to change the default settings. It is important to note here that this example is for SME’s who use the PCB table for their payroll calculations. To simulate the PCB table calculations it is necessary to change the default PCB calculation settings. This can be found under the Default tab.
Calculate Monthly Payroll
Update individual staff information. A detailed video can be found at : Video – Staff Data Entry and Update Procedure. Make sure you choose the correct month.
The sequence is :
- Initialize month
- Update month
- Update YTD.

Monthly Procedures 
- Click Initialize Month Values first.
- Go to Month screen and edit as necessary.
- Compare the values against your manual calculations.
- Click Calc Month to verify the calculations. If the values are different from your original manual calculations, set the screen to Manual mode as explained below.
- On completing all the staff, Click on Update Full Month.
- Update Y-T-D and repeat for the next month.
Setting Calculations to Manual Mode
It is possible though that the values may differ especially for PCB. EPF and SOCSO should be the same in most cases.
 If this is the case, it is necessary to make manual change to the values.
To do this edit the monthly screen and click on “Manual” found at the bottom of the screen. The Manual box must be ticked. This sets the screen to manual mode.
When manual mode is set, all table calculations and changes to any data except for the last column will be ignored. Make changes to any of the values found here. Click on “Calc Full Month”. The totals will change based on the edited values.
The values should now match your manual calculations. Make changes as necessary for any staff with differing values.
Repeat until current month.
The above procedure is sufficient to get the data up to date till the current month. You can now go live. This process should take less than half an hour depending on the number of staff.
It is now your choice whether to continue with calculations based on the PCB table or to upgrade to computer calculations. To upgrade to computer calculations change the Default PCB Setting back to Computerised calculation.
Method 2
Alternative Fast method to start using the software immediately.
If you do not want to use the computerised PCB calculations, the Y-T-D values are not necessary. This software has a special feature to allow simulation of manual PCB calculations. All you have to do is set the default PCB calculations to manual as outlined above. In this setting, calculations will give the same results as done using the PCB table.
To simulate the PCB table calculations it is necessary to change the default PCB calculation settings. Set PCB Calculation Mode to Manual in the Default tab.
Once this is done, you can go back and add the previous month data at your own pace.
Method 3
Enter YTD values in January.
Enter the YTD totals. The total that you have done for the year and enter it in the January monthly screen.
Run Update YTD for the prior month.
E.g. if you are starting in 05-May, go to month 04-April and run Update YTD all. Then go to month 5 and continue as normal.
Set Calculations to Manual Mode
It is necessary to enter values manually.
To do this edit the monthly screen and click on “Manual” found at the bottom of the screen. The Manual box must be ticked. This sets the screen to manual mode.
When manual mode is set, all table calculations and changes to any data except for the last column will be ignored. Make changes to any of the values found here.